Route Management
This window provides insight into the meter routes within the selected utility. You can assign one or more meter readers to a route and view the status of routes, readers, and meter readings. The routes displayed are those that have been imported but not closed.
When editing route assignments you have a 30-minute window during which the editing function is locked for other users. If you refresh the screen or end the editing session, the editing lock is removed. Whenever you resume assigning routes, the editing session is restarted for another 30 minutes. If you edit the route assignments and another user is currently editing them, the system displays a warning message. See unassign readers for more information. Note that only administrator level users can edit assignments.
Using route management can be effective when a route is too large for one meter reader to finish in a single day, when mixed meter types require different equipment, or when a route spans multiple neighborhoods and must be broken into smaller geographic sections. You can also use route management when staffing changes occur—such as a reader calling out or when training new employees—and when a completed route has a high number of incomplete, skipped, or unread meters that require targeted follow-up. In these cases, you can split routes to balance workload, reduce travel time, match readers with the right equipment, maintain schedules despite staffing issues, and isolate problem areas for efficient troubleshooting.

What You Can See and Do in This Window
Click a link to display the related information or step-by-step procedure.
| – | |
| – | |
| – | |
| – | |
| – | |
| – | |
| – | |
| – | |
| – |
View the Route Assignment Summary
The Route Assignment Summary on the Route Assignments software page is a dashboard snapshot at the top of the window that shows:
- Total Routes – number of assigned and unassigned routes within the selected utility.
- Total Readers – number of meter readers assigned to one or more routes, and number of unassigned readers.
- Total Readings – number of complete and incomplete readings.
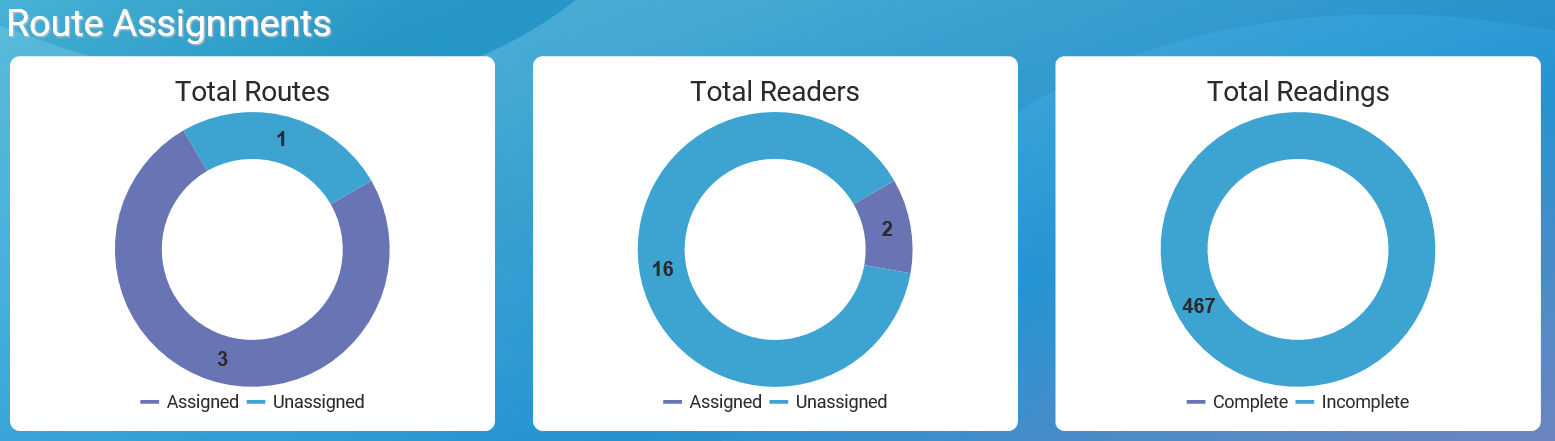
You can click Hide Summary to hide the summary dashboard and allow more room for the assignment data. Click Show Summary to show the summary dashboard.
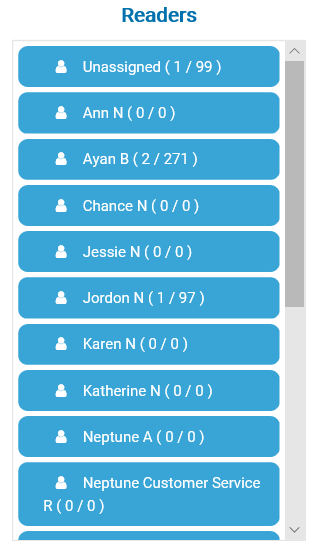
View Readers and Assignments List
On the Route Assignments software page, click  to display or hide the Readers panel on the right side of the screen. The list shows:
- All meter readers currently assigned routes and those who are available for assignment.
- Number of routes assigned to each reader.
- Number of incomplete orders–the number of assigned meters that are not yet read.
View the Route Assignments Grid
The following table defines the columns in the route assignment grid. The Mapping Subscription option enabled on the Utility Management page allows a utility to use Offline Mobile Maps and geocoding. With the subscription enabled, users see the Map Name, Map Size, and Map Created columns in the grid.
| Column | Description |
|---|---|
| Cycle / Route |
Name of the meter route within the utility. The name is a combination of:
|
| Map Created | The date the assigned map was created. |
| Map Name | Name of the map assigned to the route. |
| Map Size | Size of the map assigned to the route. |
| Reader | Reader assigned to the route. |
| Status |
Status of the route:
|
| Total Complete | Number of meters successfully read. |
| Total Incomplete | Number of meters for which a reading was not completed. |
| Total Invalid | Number of meters that produced an invalid reading. This total is included in the Total Incomplete reading. |
| Total Meters | Number of meters (assigned and unassigned) within the route. This field is the sum of Total Complete, Total Incomplete, and Total Skipped columns, by route. |
| Total Skipped | Number of meters skipped during a reading. |
| Unread | Number of meter readings that the system flagged as unread. |
You can sort and filter the grid. See Navigate in Grids for more information.
Drill Down on a Route
You can drill down to the details and KPIs on Complete, Incomplete, and Skipped routes. The drill down action displays a list of accounts in the status selected for the route selected.
- On the Neptune 360 navigation panel, select Route Assignments under Route Management.
- On the Route Assignments software page, in the Complete, Skipped, or Incomplete column, hover over the number of routes displayed in the column.
- Click
 to display the route status data in a grid.
The grid containing the details displays in a separate browser window so you can move between the details grid and the Route Assignments page.
The details grid contains details only for the number of complete, skipped, or incomplete readings shown on the route assignments grid.

- If you want to display the reading details on map, click Map to display the reading pinpoints. This feature requires that your utility is set up with geocoding and map capability.
The following table defines the data in the detail grid.
| Column | Description |
|---|---|
| Account Name | Name on the customer account. |
| Account Number | Identification number for the account. |
| Account Status | Status of the account |
| Address | Physical address of the meter location. |
| Comments | Comments associated with the meter within the route. You can see comments on the Customer Inquiry page. |
| Cycle / Route |
Name of the meter route within the utility. The name is a combination of:
|
| Days Since Read | Number of days that have passed since the meter was last read. |
| Last Reading Date / Time | Date and time of the last meter reading in MM/DD/YYYY HH:MM:SS (24- hour time) format. |
| Last Valid Reading | Last completed reading for the meter. |
| Last Valid Reading Date / Time | Date and time of the last completed meter reading in MM/DD/YYYY HH:MM:SS (24- hour time) format. |
| MIU (endpoint) ID | Identification number for the endpoint. |
| Meter Number | Identification number for the meter. |
| Meter Size | Size of the meter. |
| Read Method | Method by which the meter was read. Methods include:
|
| Reader | Reader assigned to the route. |
| Order Status | Status of the reading for the associated meter, by route status:
|
| Read Sequence | The sequence in which the reader read the meter within the cycle or route. |
| Skip Code | Code that defines why the reader skipped reading the meter. |
| Skip Date / Time | Date and time the meter reading was skipped in MM/DD/YYYY HH:MM:SS (24- hour time) format. |
For the procedures to customize the grid, see Navigate in Neptune 360.
Assign Readers to Routes - Action Menu
If you have permission to all the Route Management functions, you can assign readers to routes. You can assign readers to routes using either the menu or by dragging and dropping. You can also drag and drop to assign routes to readers.
- On the Neptune 360 navigation panel, select Route Assignments under Route Management.
- On the Route Assignments software page, click Edit.
The system changes the Edit button to Action, displays selection boxes for each Cycle / Route row, and locks the screen to prevent other users from making edits.
- Click the box for each Cycle / Route rows for which you want to assign a reader. You can assign readers to multiple routes.
- To select multiple routes at one time, verify that the View field has the Unassigned option selected, and then click the box in the header that appears under the Action button to select all routes in the grid. You can deselect any boxes, if desired.
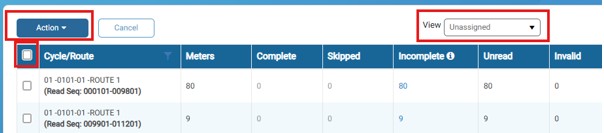
- Click the Action arrow, and then click Assign Reader.
- Click Select Reader field, and then select a reader. You can type a full or partial name in the search field to narrow down the reader list.
- You can make multiple route assignments, and then when you are ready to save them all, click Save.
Assign Routes to Readers - Drag and Drop
- On the Neptune 360 navigation panel, select Route Assignments under Route Management.
- On the Route Assignments software page, click Edit.
The system changes the Edit button to Action, displays selection boxes for each Cycle / Route row, and locks the screen to prevent other users from making edits.
- Click to display the Readers list.
- Drag and drop the route name to the reader in the list you want to assign the route.
- Click Save to assign the route to the reader.
Unassign Readers (Utility Administrator Only)
If you have permission to all Route Management functions, you can unassign readers from routes. You can click drag to unassign readers from routes:
- Drag the UNASSIGNED reader from the list to a route to unassign the reader.
- Drag a route to the UNASSIGNED reader in the list to unassign the reader.
If you click Edit to manage the route assignments and another user is currently editing them, the system displays this message:

- On the Neptune 360 navigation panel, select Route Assignments under Route Management.
- On the Route Assignments software page, click Edit.
The system changes the Edit button to Action, displays selection boxes for each Cycle / Route row, and locks the screen to prevent other users from making edits.
- Click each Cycle/Route row for which you want to unassign a reader.
- Click the Action arrow, and then click Unassign Reader.
- Click Save.
Assign an Offline Map
You can assign offline maps to a route. You can assign the same map to multiple routes but can assign only one map to a route.
- On the Neptune 360 navigation panel, select Route Assignments under Route Management.
- On the Route Assignments software page, click Edit.
- Select one or more routes for which you want to assign a map.
- Click Action, and then select Assign Map.
- In the Select Map field, click
 to display the map options associated with the site ID.
 - Select the map you want to assign, and then click Save.
Unassign an Offline Map
You can unassign offline maps that you previously assigned.
- On the Neptune 360 navigation panel, select Route Assignments under Route Management.
- On the Route Assignments software page, click Edit.
- Select one or more routes for which you want to unassign a map.
- Click Action, and then select Unassign Map.
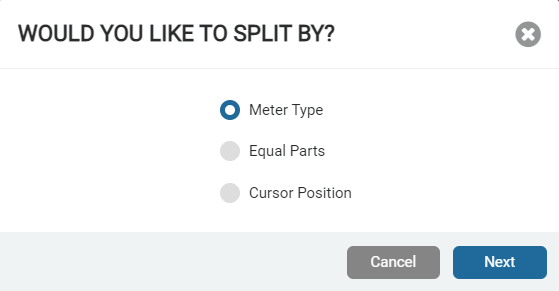
Split a Route
You can split routes imported from a customer's billing system to distribute meter reading responsibilities across multiple readers. You can split routes by:
-
Meter type – splits routes by meter type, based on how the meters are physically read. For example, some meters may not have radios and cannot be read by an MRX drive-by unit. You can split the route and assign these meters to a reader that uses a handheld reading device and assign the other meter types to a reader that uses a mobile reading device.
-
Equal parts – splits routes into equal parts to expedite reading meters on the route.
-
Cursor – splits the route at the cursor point, or at the point of a meter location (premises). You can select the specific premises on which to split the route. For example, you can split a route that divides it by neighborhoods. You can split by cursor up to 10 times. You can unsplit a route after splitting it.
After splitting a route, you can assign readers to the routes in the split. When you unassign a route, the reading assignment for the parent route is the reader assigned on the first section of the split. If a route is unassigned when you split it, it becomes unassigned again when you unsplit it.
- On the Neptune 360 navigation panel, select Route Assignments under Route Management.
- On the Route Assignments software page, click Edit.
- Click the check box for the route you want to split.
- Click Action.
- Click Split Route.
- Select the method by which you want to split the route, and then click Next.
- If you split by:
- Meter type, the system displays each meter type and the meter count for each split. The meter type, indicated by a type ID, is included in each split name.
- Equal parts, enter the number of parts you want in the split. The system displays each split part, the read sequence numbers in each split, and the meter count for each split. If the meter count leaves additional meters, the system places them into the first part in the split.
- Cursor position, filter the meters grid if required, and then select the check box for where you want to split the route. All meters above the selected check box are included in the split. You can add up to 10 splits. The system displays each split grouping in a different color. Click Next to display the read sequence and meter count in each split.
- Review the split.
- Click Save.
Unsplit a Route
- On the Neptune 360 navigation panel, select Route Assignments under Route Management.
- On the Route Assignments software page, click the check box for any meter within the route you want to unsplit.
- Click Unsplit Route.
The system displays a confirmation message and all previously-split meters revert back to the original reader assigned to them.
